EPIC!Part I
"The Summit"
The original plan was to climb Forbidden Peak as an east to west traverse so that we could climb the west ridge and avoid the late season difficulties associated with it. We got a late start in Washington Pass and packed up slowly and did some sight seeing. We ate lunch in Marblemount and finally got under way. As soon as we were hiking the Boston Basin bushwhack, I mean trail, we knew what we were getting into. It turns out we were both fairly tired from climbing South Early Winter Spire the day before and we were feeling it.

Sorting gear for Forbidden (photo by Steve Machuga)
On the way in we passed Josh and Matt who were coming down from a climb of the Direct East Ridge. We chatted a bit and got beta for the descent of the East Ledges. It was probably there that I made the decision in my head that we would probably only do the east ridge and then descend the ledges although I may not have expressed it to Steve at that time. After chatting a bit we continued on and discussed the option of descending the ledges. After some difficult water crossings in the basin, we were finally in the upper basin and setting up camp three hours after we left the car.
We pumped some water from a nice stream, and made dinner. We prepped for the next day and decided on a wake up time of 5:30am. (Josh and Matt had told us they left camp at 5:30.) We had a bit of difficulty getting to sleep because we kept thinking we were hearing female voices. This may have been true as another tent was there in the morning (About 100m downhill from our location) that wasn't there when we went to bed.
Just before the alarm went off there was some rock/ice fall on the mountain. I jumped up to make sure we were not in danger. My commotion woke Steve up and he promptly went back to sleep. I hadn't been sleeping well and mulled about in my sleeping bag for the next 15 minutes until the alarm went off. Once the alarms went off, Steve and I decided to rest in another 15 minutes or so before actually getting out of the tent. [Can you already count the many signs of an epic?] We ate breakfast, used the toilet and left camp at 6:30am.
We had good information from Josh and Matt about the problem they had on the approach and made quick time up the slabs to the snow and eventually the gully. We arrived at the notch at the base of the route around 8:30 or so. In keeping with the epic theme, we dawdled at the base for some time (including Steve needing another "bathroom break" before starting the route.) During our delay we made the decision not to down climb the west ridge. We knew we were both tired and we weren't moving that fast coming up from camp.
We eventually started climbing at 10am and I took the first lead. The first bits were 3rd class and then it got somewhat harder where I had to negotiate a few small gendarmes. Since good protection was scarce, I looked for a viable anchor location after I had about half the rope out. I wound up slightly off the crest of the ridge on the south side and was probably slightly off route. Steve made his way over to me and then slowly made about leading the next pitch.
Steve had to regain the ridge crest first and then make his way up the first significant gendarme on the ridge. This section is listed at 5.7 in the guides and that would probably be correct. It was slow going as route finding was not obvious, but more so because protection was difficult. Once finding an suitable anchor location, Steve brought me up. Two hours had passed since we started climbing and I knew that we were in for a long day. Being the optimist, I thought our speed would improve now that we got a feel for the climbing and we were back on route. So we continued on.

Following the second pitch (photo by Steve Machuga)
I led a short exposed pitch along the ridge crest with easy climbing before I got to and area that looked like it may be difficult to find an anchor in. So I went with the option I had present. (Which still felt pretty desperate to me.) I brought Steve over and we discussed the next pitch. We were a short distance from the next major gendarme which can be bypassed on the north side of the ridge. Steve led off around some minor obstacles before taking a path of least resistance on the north side of the ridge. After using up all the rope, I began to simul climb behind him as we both wound up north of the ridge proper. We continued to climb on the north side for some distance on loose dirty ledges until Steve hit a spot where he could build a reliable belay. He then belayed me to his location.
I started out on the second leg of this traverse over a rib and onto more slab like terrain heading for the notch between the last two gendarmes. It seemed we were a bit low and as I headed back up, the terrain was better for climbing and protecting. I could see I wouldn't make it to the notch in one rope, so when Steve told me I had used half the rope, I built a suitable anchor. He then led off to the notch on a full rope length and brought me up. Having looked at the rap on top of the last gendarme, I can say I am glad we decided to bypass it. (Scary overhanging rappel off a rock horn.)

Climbing up to the notch (photo by Steve Machuga)
Anchor options weren't great at the notch, and it took Steve a long while to build an anchor using a few pieces and a few natural options. This was the crux overhanging 5.8 step. I had already told him he was leading it, so we switched positions and he headed out. The step looked scary and Steve had a hard time believing it went the way it did. He tried to scope out other alternatives to it, but then faced the fact that it did go up that steeply. Steve confidently led up the steep face and began to look for a suitable belay anchor. (I told him it better be solid before starting the pitch.) He went a bit further before he built an anchor. I climbed the steep section which was pretty wild, but easier than it looked. Although it had a very funky move where you had to stand on a wobbly block in order to make a move. After reaching the belay, I was off again.

Topping out on the 5.8 (photo by Steve Machuga)
I led out a bit on what is supposed to be 5.2 terrain to the summit. It was mostly on the crest and upon approaching a minor step, with a sling on top, I set up a belay. (I mistook that to be the summit, but was unsure.) I brought Steve up to my location and he led out for the summit.

My last lead up the East Ridge (photo by Steve Machuga)
He reached the summit and set up and anchor to belay me up. I joined him at the summit around 7pm. Clouds were blowing up out of Boston Basin and blowing down the north side of the mountain. There was the smell of smoke. (We presumed the clouds were related to forest fires.) The wind was cold and we snapped a few pics before rapidly going about the rappels...

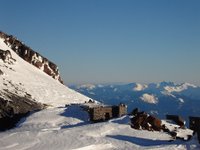
Summit shot (photo by Steve Machuga)
My photos are here.
 So far, the comments have been very positive; in particular, many expressed appreciation of the increased lighting.


 November morning in the Icicle
 Adam on the first pitch
 Adam on the second pitch
 Adam finishing the route
 Kirby Hall in afternoon sun
 Camera-shy peacock


 Last night we had Rene and Mira over for dinner and then we played Mexican Train with them. We have to get this game down before we head to Alaska with the other champion players. We had so much fun with them. It was hard saying goodbye to them, but we at least know we are very likely to see them again unlike many of the people we meet along the way.
 Laura and I planned to go ice climbing with my buddy Matt Johns from Kentucky, Joel Torretti and his buddy Josh Hurst from Maine. Yeah you read right, he came here from Maine. After a start consisting of breakfast at Valley Dairy, shopping for - drill bits, a six pack, twice forgotten pants, non-alcoholic drinks, snacks and probably more. We've learned that buying a sixer around 9:00 am is harder to do than you think... Oh yeah I almost forgot it was raining. Not the best weather for ICE climbing, or is it? Well Matt had to stay in Kentucky so we sadly were Mattless. It ended up being Laura, Joel, Josh and I. After our morning shenanigans, we decided to drive to Meadow Run in Ohiopyle to check out the Upper Meadow amphitheater for potential mixed lines. The rains stopped by the time we arrived in Ohiopyle. Upon pulling into the parking lot we saw the quantity of ice along the Lower Meadow cliff band and decided it was clearly time to climb and check out the Upper later in the day. We spent the morning cranking the mixed lines and even added an alternate left var. to Captain Caveman that traverses left more under the roof before pulling the lip around the last hanging curtain. Slightly longer and harder than Captain Caveman. All kinds of shenanigans going on there. Fun stuff... short and pumpy. Laura busted herself up falling on Anger Management (which some asshole stole the draws off of) so she stayed to climb Hemlock with me and following the advice of Dr. Torretti, decided to head home to heal for tomorrow and Sunday. The 3 of us stayed and climbed a couple more lines and decided to walk to Upper Meadow to eye the amphitheater while we still had a couple of hrs. of light. What can I say... Its steep, burly, has free hangers and pillars galore. Its impressive to see. We explored around looking at potential lines out the steep cave. We decided to work on a line that starts on some ice in the back of the cave and heads up through several overlaps to the free hanging curtain at the lip. Burly, but by no means the most difficult line there. Joel rigged a line from the top while Josh started up the ice and got the first bolt in. I put him on belay as he worked up, go into position and placed the 2nd. He came down and I was up. I went up on lead to the high point and continued up into position and located where to put the 3rd. I didn't get more than a 1/2 inch when the drill was doing no good. The battery was dead. I lowered the drill and proceeded to get myself stuck for a while. After much effort, I was back to the ground. We cleaned up and walked out as it was getting dark. Good ice, good laughs, good fun. 1 down 2 to go. Can't wait to see what tomorrow brings... Enjoy the photos!


 Today I would like to share with you that I have officially become a Bicycle Photographer. As you can imagine, this translates to a life of fame and glamour - and will finally enable me to quit my dayjob and live as a full-time
  A.T. (aka "somervillain") is a vintage bicycle lover who lives in the Boston area. He is an occasional commentator on this blog and a member of bikeforums. Based on the photos of my own bicycles that he has seen me post, A.T. invited me to document his and his wife's vintage collection. So far we have only done one photo session, and I post a few of the images here.
 The star of these photos is A.T.'s 1950s Raleigh DL-1 Roadster - the same bicycle as the Co-Habitant's
  I must say that this DL-1 is in better condition than any other I have seen, particularly the chrome parts. When I first saw this bike from a distance, my thought was that it must be a modern replica. Of course up close all the signs of wear and age are visible, but its condition is none the less terrific.
 Those who like vintage Raleigh 3-speeds know how rare it is to actually have that dynamo headlight attached to the "Heron" mount and working!
 Here is a close-up of the headlight, handlebars and rod levers. The roses are distracting here (roses in November?), but it's the best close-up I have of this area.
 Incredibly clean and shiny rod brakes.
 Front dynamo hub.
 Dynamo-powered tail light mounted on the left seat stay. What a pleasure to photograph all this stuff!
 Rear Sturmey Archer hub. Notice how clean it is! A.T. did all of the work on this bicycle himself, including assembling this hub - remarkable!
 Vintage Brooks B66 saddle, NOS Roadster saddlebag, rear rack.
 Here is the entire bicycle again, from the non-chaindrive side. I should explain that I can't take digital photography seriously (as opposed to film photography), and therefore own no professional digital equipment. These photos were all taken with my tiny point-and-shoot camera. I could have done a much better job with proper equipment. Any suggestions? But there I go, getting ahead of myself again.
 A few have already asked me about the location in these photos. All I can say, is that it is my secret magical bike photography spot, and the same "nice" neighborhood discussed in this post. It is ridiculously scenic and resembles England, which is why I thought the vintage Raleigh would look especially at home against this backdrop. I hope you enjoyed the photos of this magnificent bicycle and thank you A.T. for the permission to post these. Additional pictures of this bicycle can be viewed here.